
Your fireplace is the heart of your home-a lovely meeting point for family and friends. Now it seems to be a little boring for you. Just make a DIY fireplace mantel to spice it up. Apart from adding to the aesthetic value of the space, it can serve as a shelf to keep displays, photographs or seasonal novelties.
The best thing about this project is that you need not be some kind of outstanding DIYer to perform this task. A handful of materials and tools will produce an inspiring mantel that looks professionally done. So here is an entire tutorial on how to build and install your very own DIY fireplace mantel, from introduction to completion. Let’s get started on it!
Benefits of Build a DIY Fireplace Mantel?
Creating a DIY fireplace mantel offers many benefits to your home, blending creativity, cost savings and personal style. A custom mantel enhances living space, creates a warm focal point and reflects your unique taste. DIY projects empower homeowners to experiment with designs, materials and finishes, ensuring a perfect match for any decor.
Plus, creating your own mantel adds home value while also adding a handmade, artistic touch. Enjoy the satisfaction of a project tailored to your needs, while learning new skills. Learn how creating a DIY fireplace mantel can transform your room with affordable elegance and practical innovation today.
Materials and Tools You’ll Need
Before you begin, gather the following supplies:
Materials:
- Wood planks (common choices include pine, oak, or reclaimed wood)
- Wood stain or paint (choose a color that complements your room)
- Sandpaper (medium and fine grit) or an electric sander
- Wood glue
- Nails, screws, or a nail gun
- Decorative brackets (optional, for added support)
- Wood filler (for covering nail holes or imperfections)
Tools:
- Measuring tape
- Level
- Saw (circular saw, miter saw, or hand saw)
- Drill
- Clamps (to hold pieces in place while assembling)
- Safety gear (gloves, goggles, and a mask for sanding)
Step-by-Step Tutorial: Building a DIY Fireplace Mantel
Step 1: Measure Your Fireplace
The first step in creating your DIY Fireplace Mantel is to measure the width of your fireplace. This will determine the size of your mantel shelf.

- Use a measuring tape to measure the width of the fireplace opening.
- Add 6-12 inches on each side for overhang (this creates a balanced look).
- Write down your measurements and double-check them before cutting any wood.
Pro Tip: If you’re unsure about the overhang, start with 6 inches and adjust as needed.
Step 2: Cut the Wood
Once you have your measurements, it’s time to cut the wood for your mantel shelf.
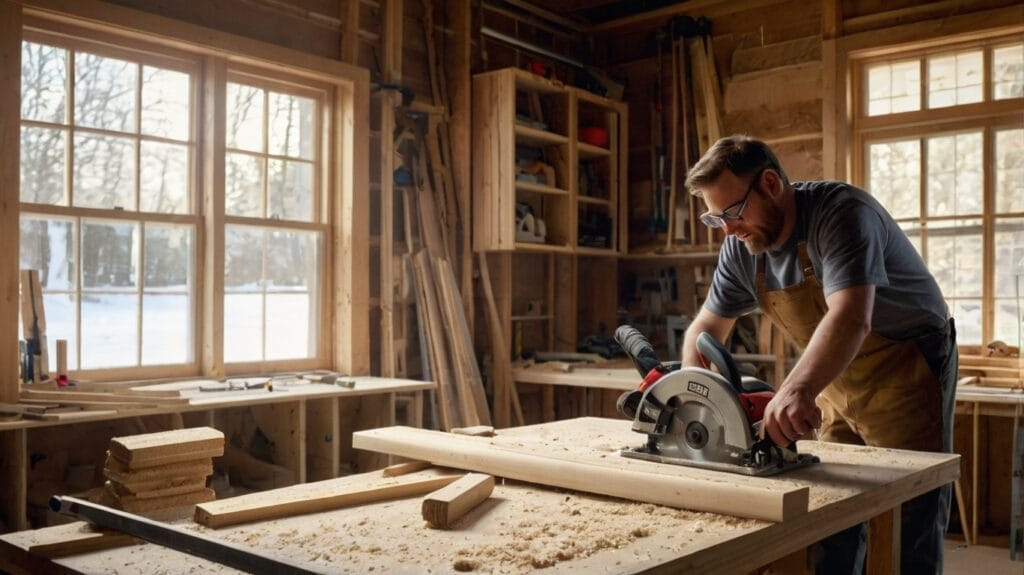
- If you’re using a single wood plank, cut it to the desired length using a saw.
- If you’re building a layered mantel (e.g., a top piece with a decorative front piece), cut each piece separately.
- Sand the edges of the wood to remove any roughness or splinters.
Pro Tip: If you don’t have access to a saw, many hardware stores will cut wood for you. Just bring your measurements!
Step 3: Sand the Wood
Sanding is an essential step to ensure your DIY Fireplace Mantel looks polished and professional.
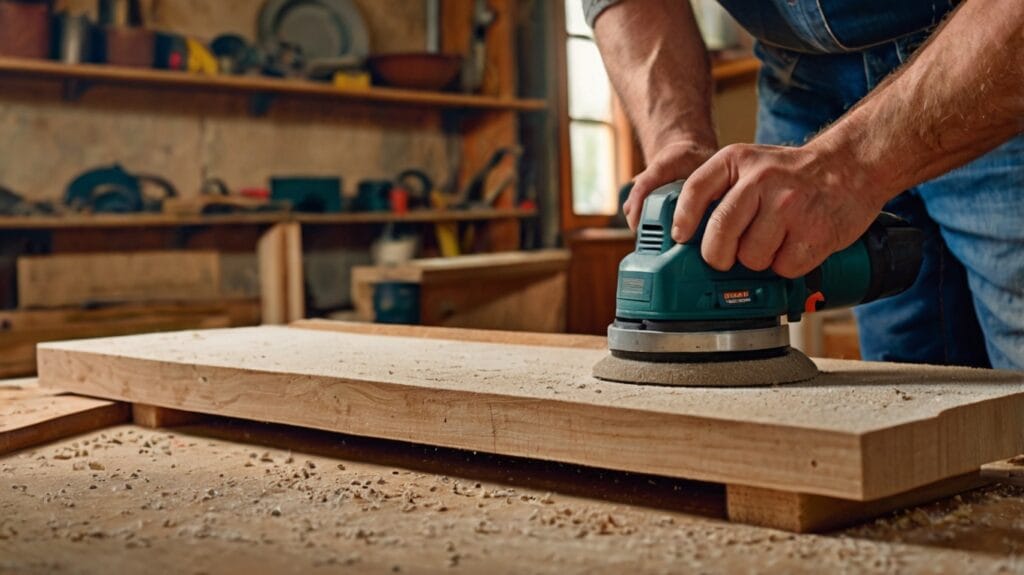
- Start with medium-grit sandpaper to remove any rough spots or imperfections.
- Switch to fine-grit sandpaper to smooth the surface.
- Wipe away dust with a damp cloth before moving on to the next step.
Pro Tip: If you’re using reclaimed wood, sand lightly to preserve its rustic charm.
Step 4: Stain or Paint the Wood
Now it’s time to add color to your mantel. Whether you prefer a natural wood look or a bold pop of color, this step is where your personal style shines.

- If you’re staining the wood, apply the stain with a brush or cloth, following the grain of the wood. Let it dry completely, then apply a second coat if desired.
- If you’re painting the wood, use a primer first to ensure even coverage. Once the primer is dry, apply your chosen paint color.
- Let the stain or paint dry completely before handling the wood.
Pro Tip: Test your stain or paint on a small piece of wood first to make sure you like the color.
Step 5: Assemble the Mantel
If you’re building a layered mantel, this is the step where you’ll attach the front piece to the top shelf.

- Apply wood glue to the edge of the front piece and press it against the underside of the top shelf.
- Use clamps to hold the pieces in place while the glue dries.
- For extra stability, drill screws through the top shelf into the front piece.
- Fill any nail holes or gaps with wood filler, then sand lightly once it’s dry.
Pro Tip: If you’re using decorative brackets, attach them to the underside of the mantel for added support and style.
Step 6: Install the Mantel
With your DIY Fireplace Mantel assembled, it’s time to install it above your fireplace.
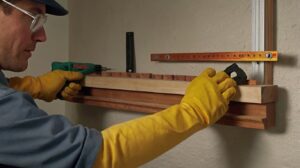
- Hold the mantel against the wall and use a level to make sure it’s straight.
- Mark the placement with a pencil.
- If you’re attaching the mantel to a brick or stone fireplace, use masonry screws and a drill to secure it.
- If you’re attaching it to drywall, use heavy-duty brackets or wall anchors for support.
- Double-check that the mantle is level before tightening the screws.
Pro Tip: For a floating mantel look, use hidden cleats or French cleats to attach the mantel to the wall.
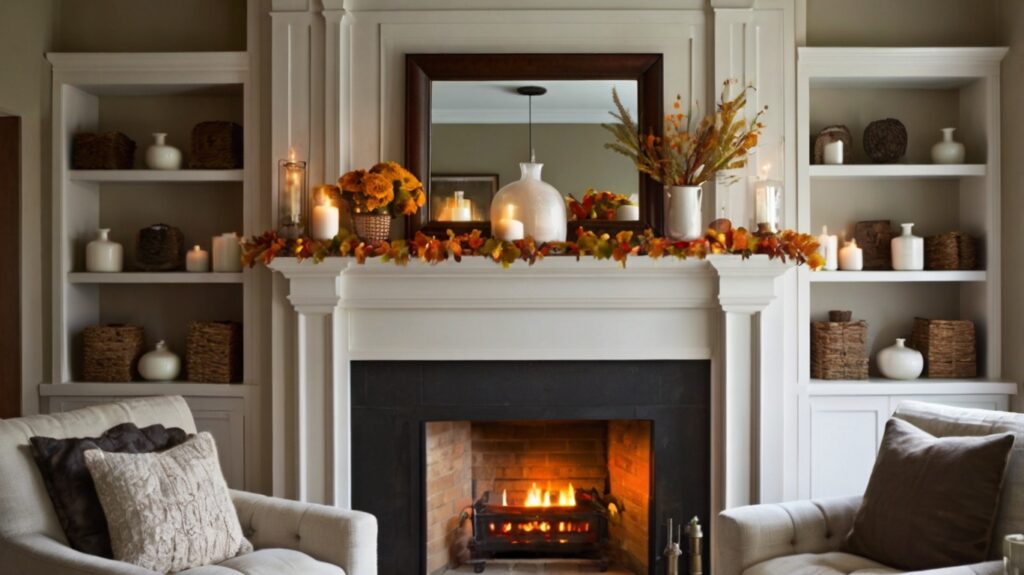
Step 7: Style Your Mantel
Now that your DIY Fireplace Mantel is installed, it’s time to decorate! Here are a few ideas to get you started.

- Layered Look: Add depth by placing a mirror or artwork against the wall, then layer smaller decor items in front.
- Seasonal Decor: Switch up your mantel decor with the seasons—pumpkins in the fall, garland in the winter, and fresh flowers in the spring.
- Lighting: Incorporate candles, lanterns, or string lights for a warm, inviting glow.
Time and Cost Estimate
Before starting your project, it’s helpful to know how much time and money you’ll need to invest. Here’s a breakdown:
Time Estimate:
- Measuring and Cutting: 1 hour
- Sanding: 1-2 hours (depending on the wood and tools used)
- Staining/Painting: 2-3 hours (including drying time)
- Assembly and Installation: 1-2 hours
- Total Time: 5-8 hours (can be split over multiple days)
Cost Estimate:
- Wood planks: Approximately $20–$50 (depending on the type and size)
- Stain or paint: Around $10–$20
- Sandpaper or electric sander: Roughly $5–$30
- Brackets or screws: About $10–$20
Total Cost: Roughly $45–$120 (depending on what materials you already have and where you shop)
Pro Tip: If you’re on a tight budget, consider using reclaimed wood or shopping for materials at discount stores.
Why Trust Us?
They are passionate about teaching the art of working toward the creation of do-it-yourself projects with great confidence. Our members have had long experience in home improvement, woodworking, and crafts and have tested every project they recommend to see if it is very easy and achievable.
We understand that every home is a world of its own, and thus provide you with tips and tricks that can be tweaked to fit your individuality. DIYCreating.Com is here for you every step of the journey, whether you’re a seasoned DIYer or stepping into world creation for the first time.
Conclusion
The fun and rewarding experience of creating a DIY fireplace mantel can really transform the look of any living room. Follow this step-by-step tutorial to ensure that even beginners will be able to create a beautiful custom-made mantel that reflects their home’s distinctive charm.
So grab your tools, let your imagination run wild, and get to work creating a mantel that’s like no other in the world. Please share photos of your project on our social media platforms and tag #DIYCreating; we want to see what you’ve created! If you want to receive more DIY inspiration, don’t forget to subscribe to our newsletter for weekly tips and tutorials.